TECHNOLOGY INSPIRATION
Technology-People-Innovation

Articles by "Computer"


The hard disk drive in your computer has a limited life expectancy. If you're unlucky, your drive will die suddenly. If you're lucky, it will break down slowly over a long period. Make no mistake, though: Someday, your hard drivewill die. That's why it's important to check its health regularly and keep it in the best possible shape. Fortunately, you can do several things to check and maintain your drive:

Defragment the hard drive with Windows' defragmenting tool

For most users, the main hard drive is designated the C: drive; it contains Windows, your applications, and your data. This drive has the most storage. Here's how to defragment your hard drive:

  1. Choose Start→All Programs→Accessories->System Tools→Disk Defragmenter.

    The Disk Defragmenter dialog box appears.

    image0.jpg
  2. Select the drive that you want to defragment.

    Most people will choose the C: drive. You may also see a much smaller D: drive, which likely contains the files to restore your computer to factory settings. You don't want to alter anything on this recovery drive.

  3. Click Defragment (Windows XP) or Defragment Disk (Vista and Windows 7).

    The defragmenter analyzes the disk for degree of fragmentation and then begins the defragmentation process. In Windows XP, you see a graphical display that represents the hard drive before and after defragmentation. In Vista and Windows 7, you see a countdown of the percentage of defragmentation completed.

  4. Choosing File→Exit (Windows XP) or click the Close button(Vista and Windows 7).

    The Disk Defragmenter closes.

Tidy up computer space with Disk Cleanup

How often you should run the Disk Cleanup utility depends on your habits. If you do a lot of Internet browsing, and disk space is running low, run the utility. Otherwise, every few months is probably often enough.

  1. Choose Start→My Computer or Start→My Computer.

    The My Computer/Computer window appears.

  2. Right-click the drive you want to check and choose Properties from the shortcut menu.

    image1.jpg

    The drive's Properties dialog box appears.

  3. Click the General tab, if it isn't already open. If you want, check the Compress This Drive to Save Disk Space check box.

    This option compresses old files that you haven't used for a while.

  4. 4.Click the Disk Cleanup button.

    The system churns away for a while, examining your drive and calculating how much garbage it can locate. Finally, the Disk Cleanup dialog box opens, indicating how much junk is sitting around in places like the folders for downloaded program files, temporary Internet files, and the Recycle Bin, and suggesting files to delete.

    image2.jpg
  5. Clear the check boxes next to any files that you want to keep; check the check boxes next to any additional files that you want to clear off the disk.

    For most users, it's best to delete only the recommended files. If you choose to go further, click each file and read its description before proceeding.

  6. Click OK.

    Windows asks you to confirm that you want to delete these files permanently.

  7. Click Yes (Windows XP) or Delete Files (Vista and Windows 7).

    The files are deleted.


Although there are unlimited possible combinations of hardwaresettings, you can trace most hardware problems to a relatively small number of causes. Here are some tips for troubleshooting some of the most common PC problems.

  • Your computer is suddenly silent. Make sure that you haven't muted the sound. The sound card or adapter inside your PC has failed or is no longer adequate for your needs.

    Solution: Instead of opening the case, plug in an external sound adapter such as Creative's USB SoundBlaster Live! 24-Bit External, which attaches to aUSB port on almost any desktop or laptop computer.

  • Your PC needs new or better wireless capability. You want to give your computer the ability to communicate wirelessly with other devices, or you need to upgrade an outdated or malfunctioning built-in Wi-Fi adapter.

    Solution: Several manufacturers offer external Wi-Fi adapters and antennas that connect to your PC through the USB port. One advantage of using an external Wi-Fi adapter is that it usually comes with a more substantial antenna than its internal equivalent, and you can adjust the placement of that antenna to get the best transmission and reception in your home or office. The latest "N" Wi-Fi technology adapters have a small footprint and offer better coverage than earlier models do.

    image0.jpg
  • You can't install programs on a computer with no CD/DVD drive. If you own a minimalist netbook or a small desktopcomputer, the tiny size and low cost often come at the expense of things like a CD/DVD drive. But without a CD/DVD drive, how do you install new programs?

    Solution: A couple of simple work-arounds are available. The first and most obvious solution is to download programs or data over the Internet or across a local area network or to use a device such as a flash memory drive to transfer program content to the computer. You can purchase very large flash drives to store up to 256GB worth of programs or data.

    image1.jpg

    Another option is to install an external drive. Drives of this type are small units, similar to those used in full-feature laptops, that draw electrical power from wall current and connect to the computer through the USB port.

    image2.jpg


Before you can scan documents into your computer with a scanner, you need to install the scanner driver so that your scanner and computer can communicate. Start by connecting the scanner to your computer's USB port (see your scanner manual for information about how it connects to your computer).

Some scanners use Plug and Play, a technology that Windows uses to recognize equipment and automatically install and set it up. If your scanner is Plug and Play-enabled, Windows 7 shows a Found New Hardware message in the Taskbar notification area (in the lower-right corner). Most Plug and Play devices will then automatically install, the message will change to verify the installation is complete, and that's all you have to do.

  1. Turn the scanner on.

    If you're not using a Plug and Play device or Windows doesn't have the driver for that device, you see the Found New Hardware message.

  2. Click the Found New Hardware message, click Yes, This Time Only, and then click Next again.

    You only need to do this step if you don't permit Windows 7 to automatically connect to Windows Update. Otherwise, you don't see the Found New Hardware Wizard.

  3. If you have a CD for the scanner, insert it in your CD drive and click Next.

    Windows 7 searches for your scanner driver software and installs it.

  4. Choose Start→Control Panel and type scanners in the Search box.

    Windows returns a set of links.

  5. Click the View Scanners and Cameras link.

    The Scanners and Cameras window appears.

  6. Click the Add Device button and then click Next.

    The Scanner and Camera Installation Wizard window appears. When you click Next, the next screen of the wizard appears.

    image0.jpg
  7. Click a Manufacturer in the list on the left and then click a model in the list on the right.

    Now it's just a matter of following the wizard directions based on the model of scanner you choose and whether you have a manufacturer's disc (a CD- or DVD-ROM). If you don't have a disc, Windows can help you download software from the Internet.

  8. When you reach the end of the wizard, click Finish.

    The installation is complete.


After you install a scanner, you may want to take a look at its default settings or even change them. Fortunately, modifying the scanner settings is an easy task.

  1. Choose Start→Control Panel. Type scanners in the Control Panel search field and press Enter.

    The Control Panel window appears.

  2. Click View Scanners and Cameras.

    You see a list of installed scanners in the Scanners and Cameras dialog box.

    image0.jpg
  3. Click any scanner in the Scanners and Cameras area and then click the Scan Profiles button.

    The Profiles dialog box appears.

  4. Select a scanner and click Edit.

    The Edit Default Profile dialog box appears.

    image1.jpg
  5. Review the settings.

    These settings may include (depending on your scanner model) color management for fine-tuning the way colors are scanned and resolution settings that control how detailed a scan is performed. (The higher the resolution, the crisper and cleaner your electronic document, but the more time it may take to scan.)

  6. Click Save Profile to return to the Properties dialog box and then click the Close buttontwice.

    The Scan Profiles and Scanners and Cameras windows close.

  7. When you're ready to run a scan, place the item to be scanned in your scanner.

    Depending on your model, the item may be placed on a flat "bed" with a hinged cover or fed through a tray. Check your scanner's manual for the specific procedure to initiate a scan (for example, pressing a Scan or Start button). After you begin the scan, your computer automatically detects it and displays a dialog box showing you the scan progress and allowing you to view and save the scanned item.


You can set up a default printer that will be used every time you print so that you don't have to select a printer each time. Here's how to make a printer the default from your computer:

  1. Choose Start→Devices and Printers.

    The Devices and Printers window appears. The current default printer is indicated by a check mark.

    image0.jpg
  2. Right-click any printer that isn't set as the default and choose Set as Default Printer from the shortcut menu.

    image1.jpg

    If you right-click the printer that is already set as the default, the Set as Default Printer command won't be available on the shortcut menu.

  3. Click the Close button in the Devices and Printers window.

    Your new settings are saved.

To modify printing properties that are available for your particular printer model (for example, whether the printer prints in draft or high-quality mode, or whether it uses color or only black and white), right-click a printer in the Devices and Printers window and choose Printing Preferences. This same dialog box is available from most common Windows-based softwareprograms, such as Microsoft Word or Excel, by clicking the Properties button in the Print dialog box.


Over time, you may want to upgrade to a new printer and get rid of your old one. When you do, you also may want to remove the older printerdriver from your computer so that your Printers window isn't cluttered with printers you don't need anymore.

If you remove a printer, it's removed from the list of installed printers, and if it was the default printer, Windows makes another printer you have installed the default printer. You can no longer print to the printer you removed unless you install it again.

To remove a printer:

  1. Choose Start→Devices and Printers (in the Hardware and Sound group).

    The Devices and Printers window appears.

    image0.jpg
  2. Right-click a printer and choose Remove Device.

    You can also select the printer and click the Remove Device button at the top of the window.

  3. In the Printers dialog box that appears, click Yes.

    The Devices and Printers window closes, and your printer is removed from the printer list.


You can set up a default printer that will be used every time you print so that you don't have to select a printer each time. Here's how to make a printer the default from your computer:

  1. Choose Start→Devices and Printers.

    The Devices and Printers window appears. The current default printer is indicated by a check mark.

    image0.jpg
  2. Right-click any printer that isn't set as the default and choose Set as Default Printer from the shortcut menu.

    image1.jpg

    If you right-click the printer that is already set as the default, the Set as Default Printer command won't be available on the shortcut menu.

  3. Click the Close button in the Devices and Printers window.

    Your new settings are saved.

To modify printing properties that are available for your particular printer model (for example, whether the printer prints in draft or high-quality mode, or whether it uses color or only black and white), right-click a printer in the Devices and Printers window and choose Printing Preferences. This same dialog box is available from most common Windows-based softwareprograms, such as Microsoft Word or Excel, by clicking the Properties button in the Print dialog box.


You can set up a default printer that will be used every time you print so that you don't have to select a printer each time. Here's how to make a printer the default from your computer:

  1. Choose Start→Devices and Printers.

    The Devices and Printers window appears. The current default printer is indicated by a check mark.

    image0.jpg
  2. Right-click any printer that isn't set as the default and choose Set as Default Printer from the shortcut menu.

    image1.jpg

    If you right-click the printer that is already set as the default, the Set as Default Printer command won't be available on the shortcut menu.

  3. Click the Close button in the Devices and Printers window.

    Your new settings are saved.

To modify printing properties that are available for your particular printer model (for example, whether the printer prints in draft or high-quality mode, or whether it uses color or only black and white), right-click a printer in the Devices and Printers window and choose Printing Preferences. This same dialog box is available from most common Windows-based softwareprograms, such as Microsoft Word or Excel, by clicking the Properties button in the Print dialog box.


Over time, you may install multiple printers, in which case you may want to remind yourself of the capabilities of each or view the documents you have sent to be printed. You can also cancel existing print jobs. To view the printers you have installed and view and modify any documents currently in line for printing, follow these steps:

  1. Choose Start→View Devices and Printers.

    The Devices and Printers window displays a list of installed printers and fax machines. If a printer has documents in its print queue, the number of documents is listed at the bottom of the window.

  2. If you want more detail about the documents or want to cancel a print job, select the printer and click the See What's Printing button at the top of the window.

    A list of documents appears.

    image0.jpg
  3. Click a document and choose Document→Cancel to stop the printing, if you want.

    To return to the Devices and Printers window, click the Closebutton.

  4. Right-click any printer and then choose Properties to see details about it.

    You see information such as which port it's plugged into or whether it can print color copies.

    image1.jpg
  5. Click the Close button (the red X in the upper right).

    The Devices and Printers window closes.


You can set printer preferences, such as being able to print in color or black and white, print in draft quality (which uses less ink) or high quality (which produces a darker, crisper image), and more. Fortunately, you can modify these settings once for all documents you print.

  1. Choose Start→Devices and Printers (in the Hardware and Sound group).

    In the resulting Devices and Printers window, any printers you have installed are listed.

  2. Right-click a printer and then choose Printing Preferences.

    The Printing Preferences dialog box appears. The settings in the Printing Preferences dialog box may differ slightly depending on your printer model; color printers offer different options from black and white printers, for example.

    image0.jpg
  3. Click any of the tabs to display various settings, such as Color.

    Note that different printers may display different choices and different tabs in this dialog box, but common settings include

    image1.jpg

    Color/Grayscale: If you have a color printer, you have the option of printing in color. The grayscale option uses only black ink.

    Quality: You can print in fast or draft quality (these settings may have different names depending on your manufacturer) to save ink, or you can print in a higher or best quality for your finished documents. Some printers offer a dpi setting for quality — the higher the dpi setting, the better the quality.

    Paper Source: If you have a printer with more than one paper tray, you can selectwhich tray to use for printing. For example, you may have 8½-x-11-inch paper (letter sized) in one tray and 8½-x-14-inch paper (legal sized) in another.

    Paper Size: Choose the size of paper or envelope you're printing to. In many cases, this option displays a preview that shows you which way to insert the paper. A preview is especially handy if you're printing to envelopes and need help figuring out how to insert them in your printer.

  4. Click the OK button to close the dialog box and save settings and then click the Close buttonto close other open Control Panel windows.

    Whatever settings you make using the procedure in this task are your default settings for all printing you do. However, when you're printing a document from within a program such as Works word processor, the Print dialog box you display gives you the opportunity to change the printer settings for that document only.


After you unpack your new computer, you may need help with its setup. Your computer comes with a monitor, keyboard, andmouse. You should connect these items before you turn on your new computer.

Your computer will offer several types of connection ports, but USBports are becoming the most common. Wireless keyboards and mouses use a small transmitter that you insert into a USB port, for example.

Use the following table in conjunction with the figure to identify device-to-PC connector ports.

image0.jpg
ConnectionLocationWhat It's Good For
VGA port1Connect your monitor.
USB port2Connect various USB devices, such as a digital camera.
Parallel port3Connect a non-USB printer.
Audio4Connect speakers.


When you shop for a computer, you'll want to pay attention to bothprocessor speed and memory before you buy. Your computer contains a processor contained on a computer chip. The speed at which your computer runs programs or completes tasks is determined in great measure by your computer's processor speed.

In addition, computers have a certain amount of storage capacity for running programs and storing data. You'll see specifications for RAM and hard drive memory when you go computer shopping.

Processor speed is measured in gigahertz (GHz). The higher this measurement, the faster the processor. It's hard to say the speed you should look for because these chips are constantly getting smaller and contain more and more power. However, when you shop, know that the higher numbers give the best performance and factor that into your decision depending on your needs.

Just like processor speed, the specific numbers for RAM and hard drive memory change frequently as well. As a general guideline, look for higher RAM numbers if you feel you need more storage capacity.

Here are a few other pointers to keep in mind:

  • RAM is the memory needed to simply access and run programs. RAM chips come in different types, including DRAM, SDRAM, and the latest version, DDR2. Look for a minimum of 1 gigabyte (GB) of RAM for everyday computing.

  • RAM chips are rated by access speed, which relates to how quickly a request for data from your system can be completed. You might see RAM speed measured in megahertz (MHz). Today, 800 MHz could be considered good access speed.

  • Your hard drive has a certain capacity for data storage measured in gigabytes (GB). These days you should probably look for a minimum of a 160GB hard drive, but hard drives can come with a range of huge capacities, with the largest being measured in terabytes (TB, measured in thousands of gigabytes).

  • Your computer will require some RAM to run the operatingsystem. Windows 7 requires 1GB of main memory and 16GB of hard drive space.


After you connect your monitor,keyboard, and mouse to your new computer and your computer is plugged into an electrical outlet or strip, you're ready to turn it on and then log on. Simply press the power button on your computer to begin the Windows 7 start-up sequence.

In the resulting Windows 7 Welcome screen, enter your password, if you have one. If you haven't set up the password protection feature for more than one user, you're taken directly to the Windows 7 desktop.

image0.jpg

After you set up more than one user, before you get to the password screen, you have to clickthe icon for the user you want to log on as.

If you've set up multiple users, click the arrow button or click Switch User and choose another user to log on as. Then type your password. Windows 7 verifies your password and displays the Windows 7 desktop. (Note:) The icons on your desktop may vary depending on what programs your computer manufacturer may have installed.

After you're logged in, to change to another user account, first save any open documents, close any open applications, and then choose Start. Then click the arrow next to the button, labeled Shut Down, in the bottom-right corner of the Start menu and choose Log Off. Windows 7 logs off and displays a list of users. To log on again, click a user icon.

To create another user, choose Start@@→Control Panel, and, under the User Accounts and Family Safety heading, click Add or Remove User Accounts. Then click Create a New Account. Follow instructions to enter a name for the account and set a password for it, if you like.


Though you may have used akeyboard of some type or a traditional mouse attached to adesktop computer, a laptop pointingdevice, called a touchpad, may be new to you. Frankly, a laptop touchpad, which is essentially your laptop's built-in mouse, takes a little getting used to.

Laptop mouses come in two types: the touchpad and the pointing stick. The touchpad, by far the most common type, is a flat area, located beneath your keyboard. A pointing stick is a small button located among your computer's keys.

When you move your finger across the touchpad surface or place your finger on the pointing stick and move the stick slightly in any direction, a corresponding mouse pointer moves around your computer screen. With a touchpad, which is what you're likely to have on your laptop, you perform clickingactions to open or select things on screen by using the right and left buttons on the bottom of the touchpad.

The left button on the touchpad is used for left-click actions and the right button for right-click actions. Left-clicking opens or selects items, while right-clicking opens a shortcut menu from which you can choose commands to perform actions.

image0.jpg

Here are the main functions of a touchpad and how to control them:

  • Clicking: When people say "click," they mean "press and release the left mouse button." Clicking has a variety of uses. You can click while in a document to move the insertionpoint, a little line that indicates where your next action will take place.

    For example, you might click in front of a word you already typed and then type another word to appear before it in a letter. Clicking is also used in various windows to select check boxes or radio buttons (also called option buttons) to turn features on or off, or to select objects such as a picture or table in your document. You can also double-click to open objects for editing or to quickly select whole words.

  • Right-clicking: If you click the right touchpad button, Windows displays a shortcut menu that is specific to the item you clicked. For example, if you right-click a picture, the menu that appears gives you options for working with the picture. If you right-click the Windows desktop, the menu that appears lets you choose commands that display a different view or change desktop properties.

  • Clicking and dragging: To click and drag, you press and continue to hold down the left mouse button and then move (drag) the mouse to another location. For example, you can press the left touchpad button (keeping it held down) and drag your finger on a touchpad up, down, right, or left to highlight contents of your document.

    This highlighted text is selected, meaning that any action you perform, such as pressing the Delete key on your keyboard or clicking a button for Bold formatting, is performed on the selected text.

  • Scrolling: Many touchpads and wireless mouse models have a way to scroll through a document or Web site on your screen. Just roll the wheel on a mouse down to move through pages going forward or scroll up to move backward in your document. With a touchpad, there is often an area marked on the right or left where you can run your finger up or down to scroll through a document.

If you're used to a desktop computer mouse and can't get the hang of the built-in mouse on your laptop, consider buying a portable wireless mouse. By plugging a small transmitter into a USB port on your laptop, you can use this more standard mouse to point, click, and drag, just as you do with a desktop computer.


To turn off your computer when you're done using it, you need to initiate a shut down sequence in your operating system instead of simply turning off the power. Choose Start and then click the Shut Down button.

If you prefer to stop your computer running but not turn the power off, click the arrow to the right of the Shut Down button and, in the resulting shortcut menu, choose Hibernate on a laptop (or simply close the lid of your laptop) to shut the computer down. If you want toreboot (turn off and turn back on) your computer, choose Restart.

image0.jpg

If you're going away for a while but don't want to go through the whole booting up sequence complete with Windows 7 music when you return, you don't have to turn off your computer. Just click the Sleep command instead to put your computer into a kind of sleeping state where the screen goes black and the fan shuts down.

When you get back, just click yourmouse button or press Enter or, in some cases (especially on some laptops), press the Power button. Your computer springs to life, and whatever programs and documents you had open are still open.

If your computer freezes up for some reason, you can turn it off in a couple of ways. Press Ctrl+Alt+Delete twice in a row or press the power button on your CPU and hold it until the computer shuts down.

Don't simply turn off your computer at the power source unless you have to because of a computer dysfunction. Windows may not start up properly the next time you turn it on if you don't follow the proper shut down procedure.


The best repair is the one you don't have to make. If you can keep your computer up to date and in tune, you and your PC will live a happier, more productive life. Start by making sure that your computer's hard drive is in tip-top shape by regularly cleaning it up

  1. Choose Start→All Programs→Accessories. SelectSystem Tools and click Disk Cleanup.

    The Disk Cleanup dialog box appears.

    image0.jpgimage1.jpg
  2. In the Files to Delete list, check the boxes next to the names of the files you want to remove and clear the boxes next to any files you want to keep. Click the Clean Up System Files button.

    The list of files you can remove safely expands, and the More Options tab appears.

    image2.jpgimage3.jpg
  3. Click the More Options tab to clean up programs you don't use or to remove SystemRestore files.

    You should remove System Restore files and shadow copies only if you're desperate for hard drive space. These files can help you get your system back to normal if the current installation files become damaged or your configuration gets out of whack.

  4. Click OK to start the cleanup process.

    Windows asks whether you're sure that you want to delete these files.

  5. Click Yes.

    Your hard drive is now cleaned up.

Your computer's monitor displays images on its screen, such as the Microsoft Windows7 desktop or a document in a software program. Because you'll be looking at the monitor every time you use your computer, you need to take care of it to maintain its longevity:

  • Use a surge protector. Never plug your display directly into wall current. Instead, be sure to use a good-quality surge protector. Damage caused by an electrical spike ordinarily isn't covered by manufacturer warranties.

  • Keep the air vents open. Never cover the air vents on the top or sides of a monitor. Doing so may result in a dangerous buildup of heat that can damage components or shorten their lives. Periodically, use a new paintbrush or the brush attachment of a vacuum cleaner to remove accumulated dust on the monitor's ventilation holes.

  • Leave your monitor on. The most dangerous moment in an electronic component's life is when power is first applied, and the component goes from cold and uncharged to warm and full of electricity. Avoid turning your monitor on and off more than necessary.

  • Check the connections. Make sure that the cable between the monitor and the video card is firmly attached at each end and not crimped or pinched. If you need to make adjustments and your monitor has a removable cable, unplug it and then replug it into the receptacle on the monitor. This step could reset a loose connection and remove corrosion on any of the connectors.

    image0.jpg

    If that doesn't work, unplug and reconnect the monitor cable at the computer end. You may have to use a screwdriver or thumbscrew to unlock the connection before you can unplug it. Use these locking screws when you replug the cable.

  • Klutzproof your monitor. Be sure that the monitor is safely installed on a sturdy desk, with its cable properly out of trippingrange of passersby. And, of course, don't place cups of coffee or soda anywhere in the vicinity.


Adding memory (up to your machine's specific limit) is generally the most cost-efficient way to increase its speed. Fortunately, installing memory is one of the most basic operations you can perform inside the case of your computer. You just have to pay close attention to details and take care not to damage your computer while you try to make it better.

Nearly all memory vendors provide instructions for installing their modules. Many also answer questions over the phone or through a chat feature on their Web sites.

1

    Find the right memory module.

Check the specifications for your computer to find the maximum amount of RAM it's capable of managing. Most modern computers sold to consumers can handle no more than 4GB; paying for and installing more than the maximum is a waste of money and may even cause problems in some machines.

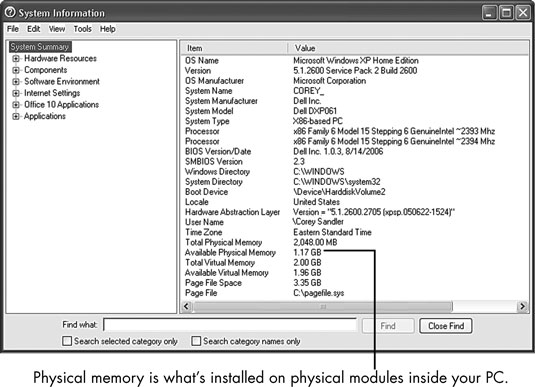
To find out what kind of memory modules you already have installed in your PC (and need to purchase), choose Start→All Programs→Accessories→System Tools→System Information. The System Information window opens, displaying a report on memory.

2

Prepare your workspace, assemble your tools, ground yourself properly, turn off the computer, and unplug the power cord and cables.

Place the computer on a sturdy, well-lighted surface, and open its case.

3

Look for a set of long slots that hold upright DIMM memory modules.

Most motherboards have two or four such slots, usually black, with a set of plastic lockdown/ejector clips at each end.

If you've already run a scanning program, you should know how many DIMM slots to look for and how many of them are already filled. In general, you should have two or four identical modules. If you're installing larger or faster modules as a pair, they should go in the first two slots. In most designs, the slots closest to the microprocessor are considered to be slots 0 and 1 (and are marked that way on the motherboard in tiny letters).

4

If you need to remove an old module to install a new one, press evenly on both of the lockdown/ejector clips to release the unit; then lift the module straight up and out of the slot.

Place the removed module on a nonconductive surface such as a cardboard box or plastic bag.

5

Take the new module out of its antistatic bag, holding it by the edges.

Avoid touching the metallic connectors on each side of the bottom of the module to keep oils from your fingers from interfering with the module's contact with the motherboard.

6

Follow the installation instructions provided by the memory seller.

In most situations, you'll be asked to put the largest-capacity modules in the first slots and the smaller ones in the higher-numbered slots.

7

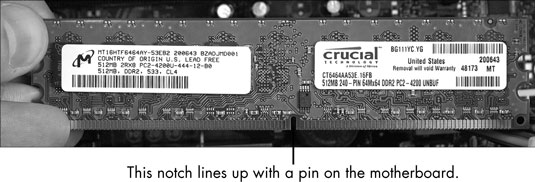
Locate the notch in the row of pins at the bottom of the module.

It needs to line up with a matching pin or key in the DIMM slot on your motherboard. The location of the notch depends on the type of module your computer uses. If the notch and pin don't line up, turn the module 180 degrees and try that way.

8

With the notch and pin aligned, press evenly on both ends of the module until it's fully inserted into the slot on the motherboard and the lockdown/ejector clips clickinto place.

Don't attempt to force the module into the slot if it seems to be a complete mismatch. Contact the provider of the memory module to make sure that you received the proper type for your PC.

9

Examine the inside of the case to make sure that all the memory modules are locked down properly and that you didn't leave anything inside.

10

Put the cover back on, secure it properly, return the machine to its usual location, reattach the cables and power cord, and turn on the juice.

11

Check the amount of installed memory.

See Step 1 if you're not sure how to do so.


If you've never owned a computer and now have one for the first time, figuring out what your computer can and can't do may be a somewhat daunting experience. The following list walks you through some things you can use your computer to do:

  • Keep in touch with friends and family. The Internet has made it possible to communicate with other people in a variety of ways, including

    • E-mail

    • Webcams (tiny, inexpensive video cameras that capture and send your image to another computer)

    • VoIP (Voice over InternetPhone), which uses your computer and Internet connection to place phone calls.

    You can also chat with others by typing messages and sending them through your computer using a technology called instant messaging. These messages are exchanged in real time so that you and your grandchild, for example, can see and reply to text immediately.

  • Research any topic from the comfort of your home. Online, you can find many reputable Web sites that help you get information on anything from expert medical advice to the best travel deals. You can read news from around the corner or around the world. You can visit government Web sites to find out information about your taxes, Social Security, and more, or even go to entertainment sites to look up your local television listings.

  • Create greeting cards, letters, or home inventories. Whether you're organizing your holiday card list or figuring out a monthly budget, computer programs can help. For example, have a look at a graph that Microsoft Excel created from data in a spreadsheet.

    image0.jpg
  • Pursue hobbies, such as genealogy or sports. You can research your favorite teams online or connect with people who have the same interests. The online world is full of special interest chat groups where you can discuss your interests with others.

    image1.jpg
  • Play interactive games with others over the Internet. You can play everything from shuffleboard to poker to action games in virtual worlds.

  • Share and create photos, drawings, and videos. If you have a digital camera, you can transfer photos to your computer (called uploading) or copy photos off the Internet and share them in e-mails or use them to create your own greeting cards.

    If you're artistically inclined, you can create digital drawings. Many popular Web sites make sharing digital movies easy, too. If you have a digital video camera and editing software, you can use editing tools to make a movie and share it with others.

  • Shop online and compare products easily, day or night.You can shop for anything from a garden shed to travel deals or a new camera. Using handy online features, you can easily compare prices from several stores or read customer product reviews.

  • Handle your financial life. You can do your banking or investing online and get up-to-the-minute data about your bank account, credit card balances, and investments.


You may have heard the wordshardware and software before and wondered what the difference was. The hardware is all the tangible computer equipment, such as thekeyboard and mouse. The software is what makes the hardware work or lets you get things done, such as writing documents with Microsoft Word or playing a Solitaire game.

Think of computer hardware as being like your television set and the shows that you watch as being like the software.

Hardware you'll find on your computer

The hardware on your computer consists of

  • A central processing unit(CPU), which is the very small, very high-tech semiconductor chip that acts as the brains of your computer. The CPU is stored in a computer tower along with the other nuts and bolts of your computer.

  • A monitor, which displays images on its screen, such as the Microsoft Windows desktop or a document in a software program.

  • A keyboard, which is similar to a typewriter keyboard. In addition to typing words, you can use a keyboard to give the computer commands.

  • A mouse, which you also use to give your computer commands. You move the mouse around your desk with your hand, which moves a pointer around on-screen. Using this pointer, you can click items like buttons that cause an action or click the screen and drag the mouse toselect text or an object to perform an action on it (such as deleting it or making the text bold).

  • Peripherals, such as a printer, speakers, webcams, and microphones. These items may or may not come with your computer when you buy it, but your computer does come with slots (called ports) where you plug in various peripherals.

Software that runs stuff on your computer

Software (also known as programs or applications) is installed on your computer hard drive, which resides in the computer casing (either in your laptop or, for a desktopcomputer, in the computer tower).

Here are a few basics about software:

  • You use software to get your work done, run entertainment programs, and browse the Internet. For example, Quicken is a financial management program you can use to balance your checkbook or keep track of your home inventory for insurance purposes.

  • Some programs come preinstalled on your computer; you can buy and install other programs as you need them. For example, there is always anoperating system on a computer, because it runs all the other programs.

    Some programs are included with your operating system, such as Solitaire, an electronic version of the old favorite card game, which comes with Windows 10. Skype, a program that enables you to make online phone calls using your computer, is a popular program that you can find on the Internet and install on your computer yourself.

  • You can uninstall programs you no longer need. Uninstalling unwanted programs helps to free up some space on your computer, which helps it perform better.

  • Some software programs called utilities exist to keep your computer in shape. An antivirusprogram is an example of a utility used to spot and erase computer viruses from your system. Your operating system (such as, Windows 10 Home Premium, which also includes some utilities, like the Windows Defender program. Windows Defender protects your computer from unwanted intrusion by malicious programs called spyware.

Contact Form

Name

Email *

Message *

Powered by Blogger.
Javascript DisablePlease Enable Javascript To See All Widget